TRAVERSE Global v11.1
Customers
Use the Customers function to set up and maintain customer records. A customer account can be set up as an open invoice or a balance forward account. For open invoice accounts, detail is kept on invoices and payments are applied to specific invoices. For balance forward accounts, detail is kept on invoices for the current month and payments are applied to the total balance.
After you set up customer records, you must create initial (opening) balances for them. The method for creating initial balances depends on whether you have open invoice accounts, balance forward accounts, or both. See Setting Up Initial Balances for information about entering initial balances.
- Click the Contact Link button on the toolbar to open the CM Contact Link dialog box. You can link the customer to a CRM contact with a Customer link type.
- Use the Age button to age the customer balance. A dialog box will open asking if you want to update the balance with real-time aging. Click Yes to proceed, or No to cancel.
- Use the Payments button, if available, to review external payment information for the customer. If the customer's Payment Method ID on the Defaults tab is set to an external payment processor, saved credit card information will appear in the External Payments screen for the customer.
Note: You cannot add, edit, or delete external CC payment information in the detail grid. You must use the Payments button on the toolbar to open the External Payments screen to perform these actions. However, if you have an EMV (card reader) device available, you can use it to enter a new card when the Use New Card check box is marked.
See the TPS Overview for more information about external payments, as well as some examples.
 External Payments sample
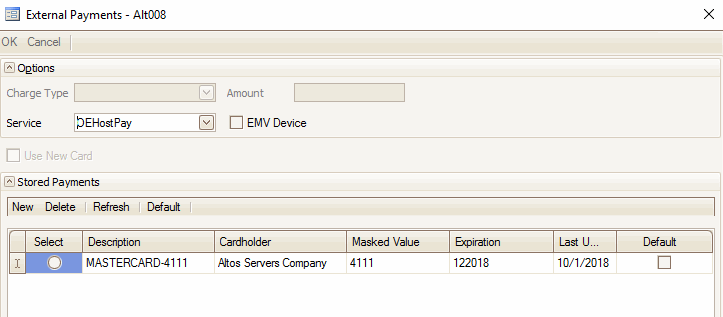
- To add a stored payment, click the New button. The payment processor credit card information entry form will appear.
- Fill out the required information on the payment provider's credit card information entry form and submit it.
- If the information is valid, you will receive a notification in the payment provider form, and the payment information will appear as a stored payment. This stored payment will appear when you open the External Payments form from other applications such as SO Orders or AR Transactions.
- Close the External Payments form to return to the Customers screen.
-
Use the Document Delivery button (
 ) on the toolbar to set up electronic delivery options for documents such as sales orders or invoices.
- Click the New button (
 ) to open a blank customer record.
- Enter a Customer ID for the new customer.
- If you are creating a new customer, you can select a customer ID to copy information from in the Copy From list box. This field is available only when you are setting up a new customer.
- Click the Search Email button (
 ) to view the emails to and/or from the vendor selected, searching for the email address on the General tab. You must have the Message Tracking Setup in System Manager completed to use this function.
 - Attachments
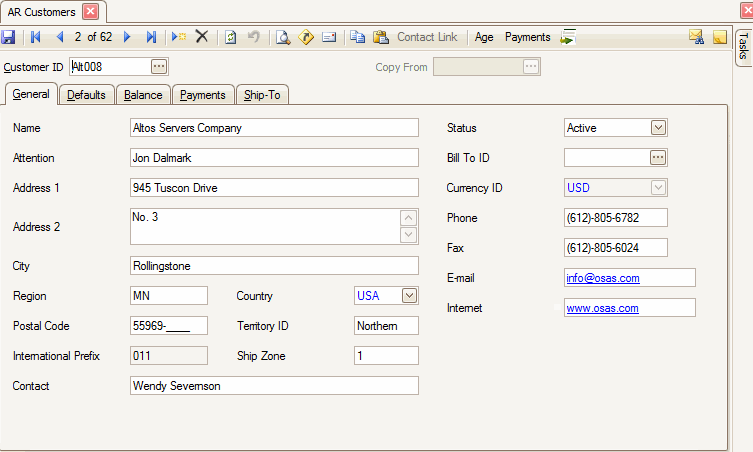
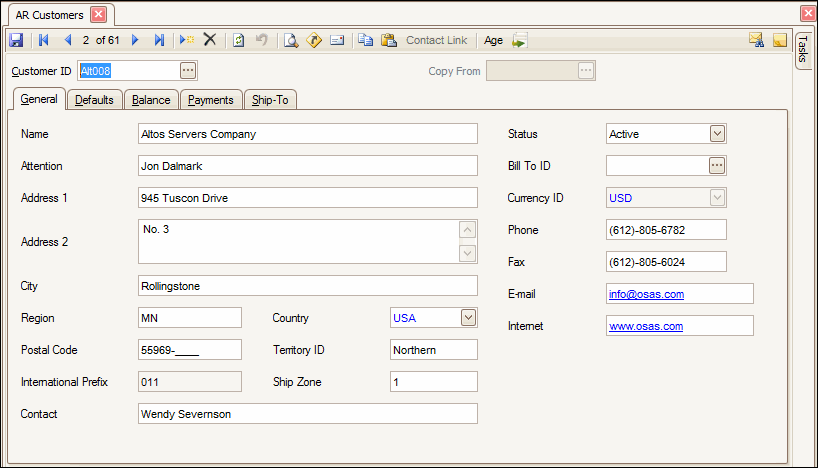
- Enter the customer’s Name.
- In the Attention text box, enter the name of the person or department to which you want to address invoices and statements. The name is printed on invoices, statements, and mailing labels.
- Enter the customer’s address. Use Ctrl+Enter to start a second line in the Address 2 text box.
- Enter the customer’s City and state or Region.
- Select the customer’s Country Code.
- Enter the customer’s Postal Code. Use the System Manager Country Codes function to set up postal code masks, international prefixes, international prefix masks, and phone and fax masks.
- Enter the customer’s Territory, if applicable.
- The customer’s International Prefix appears. See step 6 for setup information, if necessary.
- Enter the customer’s Ship Zone. This will usually be associated with a shipping zone such as those used by UPS or FedEx.
- In the Contact text box, enter the name of the person to contact regarding billing questions or invoice payments.
- Choose the customer’s active/inactive Status. Making the customer’s status “inactive” will prevent them from accidentally being engaged in future transactions.
- Choose the Bill-To ID if Sales Order transactions for this customer are to be billed to a different customer ID. If not, leave this field blank.
If a different customer ID is entered here, this customer information will be brought into the Bill-To tab in Sales Order transactions and will print in the Sold-To field on invoices. The customer information on the header tab, in the Sold To field will print in the Ship To field on the invoice.
- If you use multicurrency, select the customer’s Currency ID.
- Enter the customer’s Phone Number. See step 6 for mask setup information.
Enter the customer’s Fax Number, E-mail address, and Internet address. See step 6 for mask setup information.
The E-mail address and Internet address fields are hyperlink fields.
If you enter an e-mail address into the E-mail address field and hover your cursor over the address you will notice the cursor will change to the hyperlink hand. When you click on the E-mail address, your E-mail software will automatically be opened with a new message and the E-mail address entered into the To field.
If you enter an Internet address into the Internet address field and hover your cursor over the address you will notice the cursor will change to the hyperlink hand. When you click on the Internet address, your default web browser will automatically be opened and the web site will be brought up.
Use the Defaults tab to enter information about the customer to default during transaction entry.
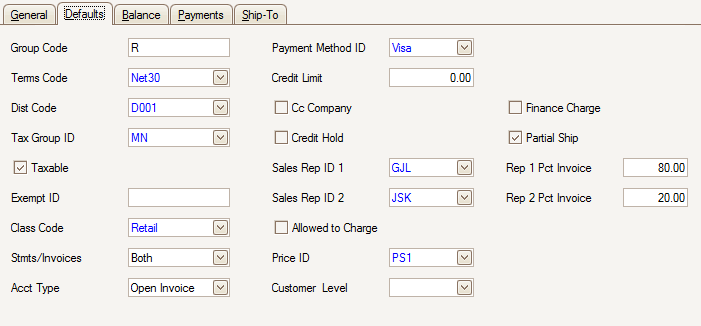
- In the Group Code text box, enter the customer’s periodic billing group code.
- Select the customer’s payment Terms Code and Distribution Code.
If you use multicurrency, the currency assigned to the Receivables account in the distribution code you select must match either the customer’s currency or the base currency. In addition, you cannot change the distribution code to one that uses a different currency if open transactions or invoices exist for the customer.
- Select the Tax Group ID of the tax location group to which you want sales tax for the customer to be assigned. Tax group IDs are set up in the Tax Location Groups function in System Manager.
- Select the Taxable check box if the customer should be charged sales tax; otherwise, clear it.
- If the customer is tax exempt and should not be charged sales tax, enter the customer’s tax Exemption ID.
- Select the customer’s Class Code.
- Select the Stmnts/Invoices field information to send to the customer: Invoice Only, Statement Only, Both, or None. For a customer that pays cash, select Invoice Only.
- Select the Acct Type assigned to the customer:
- Open Invoice customers have all invoices listed separately on their statement and cash receipts are applied to individual invoices.
- Balance Forward customers will have all open invoices combined into one open balance invoice when periodic maintenance is run. Cash receipts are applied to a period balance and not individual invoices. Statement balances will be listed as one open invoice balance.
- Select the customer’s usual Method Of Payment.
- Enter the customer’s Credit Limit. The credit limit is used in the Transactions function.
- Mark the Cc Company check box if the customer is a credit card company; otherwise, clear it.
- Mark the Credit Hold check box if the customer is on credit hold; otherwise, clear it. If you place a customer on credit hold and then enter a sale paid for on credit, a message states that the customer is on credit hold and will not let you continue. You can only enter a transaction for that customer after you uncheck the Credit Hold box.
- Mark the Finance Charge check box to apply a finance charge to the customer; otherwise, clear it.
- Mark the Partial Ship check box if the customer accepts partial shipments; otherwise, clear it. If a customer does not accept partial shipments and the quantity shipped is less than the quantity ordered, a warning message appears.
- Select the ID(s) of the Sales Rep(s) who usually sell to the customer, and enter the default Percentages of invoices for the sales reps. Each sales rep. can receive as much as 100 percent of a sale.
-
Mark the Allowed to Charge check box to select whether to require a payment to be entered for the customer in Point of Sale. Selecting this check box means you are not required to enter a payment for the customer; however, leaving the check box blank means you have to enter full payment for the transaction in Point of Sale.
You must check this box if you want to use signature capture functionality when entering orders "on-account" for the customer.
Note: This check box only appears if you have the Point of Sale application installed, and is available only when Accounts Receivable is interfaced with Point of Sale.
- Enter the Price ID assigned to the customer. This is only used if you have Sales Order installed and have Price Structures set up.
- Select the Customer Level. This option is available only if you are currently using the Sales Order application and have defined customers or groups of customers in the Customer Levels function of Sales Order.
Customer balance amounts are updated when transactions are posted. If initial balances are entered on this screen (during setup or any other time) and you elect to use online aging in the Business Rules function on the Setup and Maintenance menu, then balances are updated each time you work with an open invoice customer.
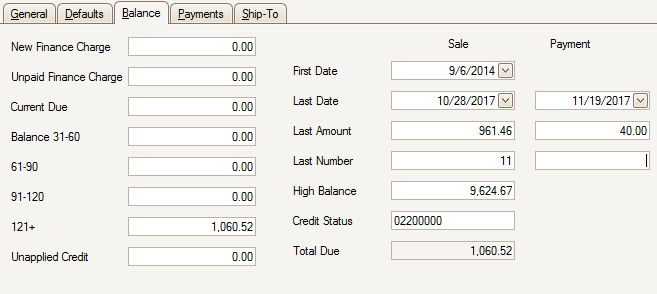
- As you assess charges using the Calculate Finance Charges function and run the Periodic Maintenance function, the finance charges are posted, and the New Finance Charge field is updated. Use the default value or enter a different one.
- If the customer has an unpaid finance charge, enter it in the Unpaid Finance Charge box or accept the default value. This value is updated automatically when you run the Periodic Maintenance function and have a New Finance Charge balance. The New Finance Charge balance is added to the current Unpaid Finance Charge amount. The amount is also updated when you post a cash receipt that has been applied to the current invoice attributable to finance charges.
- The current amount due within 30 days of the invoice date appears in the Current Due field. If you track only a summary invoice, enter the value in this field.
- Generally data is entered in the Balance fields only if the aging for balance forward customers needs to be adjusted.
If you want to enter one summary invoice for each aging period for a new customer, summarize all overdue invoices for each aging period and enter that amount in the Current Due text box. If a customer does not have a balance due for an aging period, leave the field blank. After you have entered summary balances for new customers, use the Open Invoice Setup function to create invoices for these amounts. Refer to the Open Invoices functions for more information.
NOTE: If you currently have open invoices, DO NOT use the Open Invoice Setup function. That function will delete ALL current open invoice records, for ALL customers and regenerate one open invoice for each customer for each aging period.
- Enter the balance due 31–60 days after the invoice date, 61–90 days after the invoice date, 91–120 days after the invoice date, and more than 120 days after the invoice date.
- If you owe the customer money, enter the amount in the Unapplied Credit text box.
- The new finance charge, unpaid finance charge, current due and balances are added, and the unapplied credit is subtracted. The result appears in the Total Due text box as the overall amount the customer owes you.
- In the First Date text box, enter the date of the first sale to the customer. This field, if blank, is updated when you post transactions.
- In the Last Date text box, enter the date of the last sale to the customer in the Sale column. This field is updated when you post transactions.
- Enter the Amount Of The Last Sale to the customer in the Last Amount field in the Sale column. This field is updated when you post transactions.
- Enter the Number Of The Last Invoice for the customer in the Last Number field in the Sale column. This field is updated when you post transactions.
- Enter the Date Of The Last Payment the customer made in the Last Date field in the Payment column. This field is updated when you post cash receipts.
- Enter the Amount Of The Last Payment the customer made in the Last Amount field in the Payment column. This field is updated when you post cash receipts.
- Enter the Number Of The Last Check the customer issued to you in the Last Number field in the Payment column. This field is updated when you post cash receipts.
- Enter the Highest outstanding Balance the customer had in the Highest Balance field. This field is updated when you post invoices. You can clear the customer’s high balance when you perform year-end maintenance.
- The system tracks customer payment history for the last 12 periods in the Credit Status field. Each character corresponds to one of the 12 periods—the first character is the current period; the last is the oldest period. For each position, one of these values is used:
- 0 indicates that all invoices were paid within 30 days or there was no activity.
- 1 indicates that at least one invoice was 31 to 60 days overdue.
- 2 indicates that an invoice was 61 to 90 days overdue.
- 3 indicates that an invoice was 91 to 120 days overdue.
- 4 indicates that an invoice was more than 120 days overdue.
Use the Payments tab to enter account information for credit cards and direct debit type payment methods. You can enter as many credit card and direct debit accounts as you wish. The only payment method ID’s to select from will be those that are set up with the credit card or direct debit payment types.

Select the Payment Type: Credit Card or Direct Debit.
- For Credit Card payment type:
- Enter the Card No. for the credit card you are setting up.
- Enter the Cardholder name on the credit card.
- Select the Payment Method ID to use with the corresponding account. The only payment methods valid for selection are those that are set up with credit card as the payment type.
- Enter the credit card Expiration Date. The credit card expiration date may be entered with just the month and year and when the field is saved the date will default to the last date of the month entered.
- For Direct Debit payment type:
- Enter a Description of the direct debit account.
- Enter the Account Number the customer has supplied you for their bank account.
- Enter the Bank Name.
- Select the Payment Method ID to use with the corresponding account. When working with a direct debit account the only payment methods valid for selection are those payment methods set up with direct debit as the payment type.
- Enter the bank Routing Code.
Use the Ship To tab to enter, assign, change, and delete shipping addresses. This is an additional way to access the Setup and Maintenance Ship-To Addresses function.
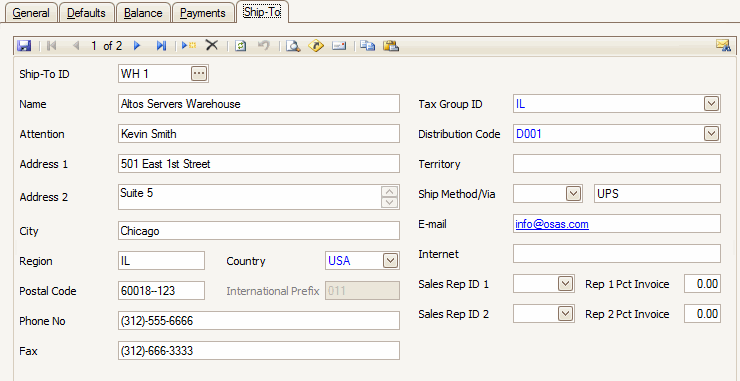
NOTE: If you do not have permission to access the Setup and Maintenance Ship-To Addresses function, this tab is unavailable. See the Administrator’s Guide for more information on setting permissions.
If you are adding a new Ship-To address, select the New Record button on the toolbar.
- Enter a new Ship-To ID or select the Ship-To ID you want to edit.
- Enter or make changes to the customer’s ship-to Name.
- Enter or make changes, in the Attention field, to the name of person or department to which the order should be shipped.
- Enter or make changes to the customer’s Address. Use Ctrl + Enter to start a second line in the Address 2 field.
- Enter or make changes to the customer’s ship-to City and Region.
- Select the customer’s ship-to Country Code.
- Enter or make changes to the customer’s ship-to Postal Code. Use the System Manager Country Codes function to set up postal code masks, international prefixes, international prefix masks, and phone and fax masks.
- The international prefix appears. See step 7 for setup information.
- Enter the customer’s ship-to Phone Number and Fax Number. See step 7 for mask setup information.
- Select the customer’s ship-to Tax Group ID. Use the Tax Location Groups function in System Manager to set up tax group IDs.
If the ship-to tax group ID is different than the customer’s tax group ID, you will be prompted to use the ship-to tax group to calculate the sales tax. You have the option to use the ship-to tax group or the customer tax group.
- Select the customer’s ship-to Distribution Code.
If the ship-to distribution code is different than the customer’s distribution code, the ship-to distribution code GL accounts will be used for the invoice.
- Enter the customer’s ship-to Territory.
- Select the Shipping Method you usually use to ship items to the customer—for example, the name of a shipping service.
A description of the ship method appears. The system saves the Ship Method/Via information with the transaction and prints it on the invoice.
- Enter or change the customer’s E-mail and Internet address.
You can launch your default e-mail program and send an e-mail to the customer or launch the customer’s web page by clicking the link in either field.
- Verify that the customer does not have an outstanding balance.
- Select a customer to delete from the Customer ID field.
- Click the Delete button, on the toolbar, to delete the selected customer's record.
Note: Deleting a customer does not automatically delete the customer comments. To delete comments, you must purge comments via System Manager. - Click Yes at the "Are you sure you want to delete selected record(s)?" prompt.
If any of your customers pay with cash and you do not want to keep track of each individual cash customer, you can set up one cash customer record for all cash sales. You can then record these cash sales as one total for the day.
- Click the New button, on the toolbar, to open a blank customer record.
- Enter an ID, such as CASH, for the cash customers in the Customer ID field.
- Select a terms code from the Terms Code field.
- Select a distribution code from the Dist Code field.
- Select a tax location from the Tax Group ID field.
- Select Invoice Only from the Stmts/Invoices field on the Defaults tab.
- Leave all other fields blank.
- Click the Save button, on the toolbar, to save the new cash customer record.
When you record cash invoices, enter CASH (or the ID you set up in step 2) in the Sold To field to record the transaction automatically. Enter the required information to complete the transaction.
The Tasks tab on the right side of the Customer maintenance screen opens the Customers Tasks Pane. The customers Tasks Pane serves as a quick way to view information such as the customer's open invoices, aging trial balance, and recurring entries, as well as customer inquiries and reports. Use the links to view customer orders, quotes, RMAs, transaction history, and other information pertaining to the customer.
You can pin and unpin the task pane to the side of the TRAVERSE window by clicking the pushpin icon. When the pushpin icon points down,  , you can always access the task pane. When the pushpin icon points to the left,
  , you must hover your cursor over the Tasks tab on the right-hand side of the TRAVERSE window to use the task pane.
Note: You can select True from the ShowTaskPanel field in the View > Preferences... screen to default task panes across the entire system to automatically expand when opening applicable functions. Selecting False in the ShowTaskPanel field defaults task panes to stay closed when opening applicable functions. Even when set to False, you can always use the pushpin icon to pin and unpin the task pane to the right-hand side of the TRAVERSE window.
The Customer List function on the Master Lists menu is there to help you print lists of basic customer information, such as name, address, and contact information. This function works in the same manner as other Master Lists functions.
Use the Customer List function to produce a basic list of the information stored in your customer record for each customer’s name, address, and contact information.
The Credit Card List function on the Master Lists menu is there to help you print a concise list of all credit cards stored in the Customers table. You can choose to print all cards or only cards that expire as of a given date. This function works in the same manner as other Master Lists functions.
Use the Credit Card List function to produce a list of credit cards stored in the customer table.
Use the Customer Detail List function to produce a list of the information stored in your customer records—customer’s name and address, pay-to name and address, sales, and balance information.
Use the Customer Labels function to print the selected size labels for customer bills or to print a customer number list.